holla! so this post took me a lot longer than i'd expected it to , but better late than never, right?
my blog has gone through a series of design changes and steps since i started it a year and a half ago, and will continue to be in flux while i figure out everything i need to know about design, html coding and typography in order to make it look just the way i like it. i'll document it all here - but for now, here's how to add or change a background in blogger. (woot!)
step one to this whole process is by far the easiest one ... find an image that you'd like to use. if you know how to use photoshop or illustrator, i just looked up some swatches and patterns that i liked and then did them as a small sample image using the paint bucket, then saved it to my desktop.
however, if you don't know how to use either of these programs, you can always google 'tileable background images/textures/patterns' and find something that suits your fancy. save the image to your computer so that you have your own copy of it, and let's get this show on the road.
for step two, you need to upload your image to the interweb. you can do this using photobucket or flickr, but if you don't have an account with either, you can start a new post in blogger, upload the image as a photo in that draft post, and save it - don't publish it.
while you're still in edit mode, preview your draft post. you should see your image displayed in the preview page. right click this image and view the properties, then click on 'copy image location' in order to copy the photo's url to the clipboard. you'll need this url to paste into the HTML template in the next step. alternatively, if you've uploaded the image with flickr or photobucket, take the same steps with right-clicking and saving the image location. now you can safely delete this draft. Choose not to delete the image when prompted, otherwise you will be unable to use this url for referencing your background image.
 step three is adding the background image to your template code.
to do this, we'll need to edit a small part of your template's html code to add this image to the background. before you do this, go to layout > edit html in your blogger dashboard, and download a copy of your current template for safekeeping.
once your original template is safe and sound on your computer, look for the following lines in the code:
body {
background:$bgcolor;
you'll find it near the top, just below the 'variable definitions' section of code.
in order to get the image to show as the background image, we need to paste the url from step two (since it's still copied to the clipboard, right?) into the code, using the following format: url(the_url_of_your_image)
In my demonstration template, the additional code appears like this: 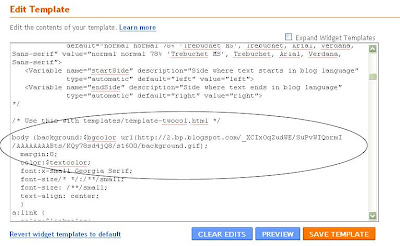
of course, your own url will be different from mine listed up there. just be sure to follow the same format, and make triple sure that the semi-colon (;) appears at the end of the statement. (this is an important step - i forgot it the first few times round and couldn't figure out why the changes weren't reflected in the preview).
now, preview your blog to see the changes. do you like what you see?
sometimes adding a texture or patterned background to your blog makes it tough to read the text - which is pretty counterproductive to redecorating, right? you've uploaded a kick-ass image for your background but nobody can read what you're trying to say. how unfortunate!
the solution to this is to customize the background colour of the main body.
to work with this part of your blog, find this line in your template's HTML code:
#outer-wrapper {
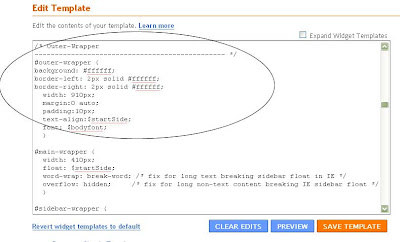
(in some templates, this may be "#outer-wrap" instead). directly below this line, add the following line of code: background: #ffffff;
this adds a white background to the main content of your blog (which includes both the blog posts and the sidebar). you can easily use a different color if you prefer by changing the hex value for white (#ffffff) to a different hex value instead. you'll need to know the code that corresponds with each colour, but a nifty little firefox add-on that i came across that you can use is colorzilla - it lets you use an eyedropper tool on any website to pull the corresponding colour code. once you have that specific code, you can use it in your template. i opted to use a plain white background, so the code i used was #fffff, but if you wanted to use a different colour (like light blue), your complete code would look a little something like this:
#outer-wrapper {
background: #E3F2FB;
width: 660px;
margin:0 auto;
padding:10px;
text-align:$startSide;
font: $bodyfont;
}
furthermore, if you want to make the foreground stand out even more from the background image, you can add a border to the left and right hand sides of the outer wrapper by adding the line (highlighted in red) to the same section we've been working with, which would make it look like this when you're done:
#outer-wrapper {
background: #E3F2FB;
border-left: 2px solid #cccccc;
border-right: 2px solid #cccccc;
width: 660px;
margin:0 auto;
padding:10px;
text-align:$startSide;
font: $bodyfont;
}
and that, my darlings, is what took me forever to figure out on saturday night at three in the morning. special thanks to this site for the oh-so-helpful information, which i've based this post on.
(am i a computer programmer yet?)

 the portion in blue adjusts the position of the image - you can change it to margin-right too, if you'd like. The attribute text-align:center; is tricky since it's not supported in some browsers, so i stayed away from it given the difficulties i had with browser compatibility when i first started blogging. (it sucks to find out that all of the poor firefox users weren't seeing things the way i was while using IE.. i promptly switched over and try to fix any overly problematic old posts as i need to)


